The composite bumper fascia has been with us since the advent of the federal government’s 5-mph bumper requirements, a law that took effect with the 1973 model year.

Made from thermal plastic olefin or some other polymer composite, the fascia is part of a bumper system, which includes an energy absorber that helps the fascia keep its shape, and the bumper beam that attaches to the frame or unibody.

The system is not only excellent at reducing weight and absorbing impact — bump drafting! — but it also allows designers more freedom with the shapes of modern cars. The drawback, if there is one, is that they can tear.

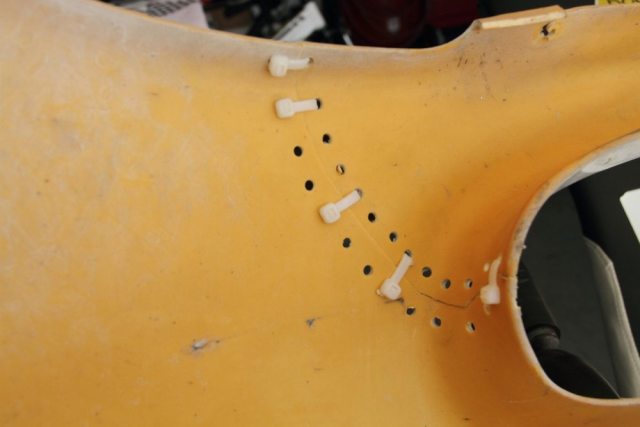
But there is a fix that doesn’t involve any special equipment that melts or welds plastic. It’s not the prettiest fix in the world, but it has been proven to work, and every NASA member already has — or should have — everything they need to make the repairs right in their toolboxes. All you need is a pencil, a drill, and some zip ties. That’s it. You can even skip the pencil and just eyeball it if you prefer.

In essence, you’re drilling holes on each side of the damaged part, then tying it together with zip ties. If you look closely next time you’re walking around the paddock, you likely will see “Frankenstitching” at work on a few cars.

During an enduro back in June, I had to take evasive action to avoid a car spinning at the exit of a turn. That evasive action led to a little air time, which tore off the chin spoiler and ripped the right side of the front fascia. The rest of the fascia was still intact, so I got out my pencil, drill and lots of zip ties. Here’s how the repair went.

During an endurance race, an off-track excursion tore off the front chin spoiler and bent back the tow hook, which ripped the front fascia at the bottom of the grill opening.
The tear was clean and there were no pieces missing, which made this a perfect candidate for “Frankenstitching.”
One easy way to begin is by holding the separated halves together and scribbling drill index marks across from on another. Make the holes just big enough for zip ties to poke through.
Slip a few zip ties through at the ends and some in the middle to keep the two halves in place while you attach the rest.
FasciaStitch11
Attach the rest of the zip ties and clip off the loose ends. Obviously, hide the clasp end behind the fascia so it looks better on the outside.
Rua Azevedo Junior, 85, Brás, São Paulo
As you can see, the process works on more expensive cars, too. We found this C6 Corvette Z06 while walking the paddock at Road America in early August, and it didn’t slow the car down one bit.
Images courtesy of caliphotography.com and Brett Becker

Join the Discussion