Every racecar driver wants more power. For our budget Honda Challenge build, we wanted more power, too. The problem was that pesky rulebook. More power usually means more modifications, and when it comes to engine internals, Honda Challenge 4 rules are specific: you can’t do it.

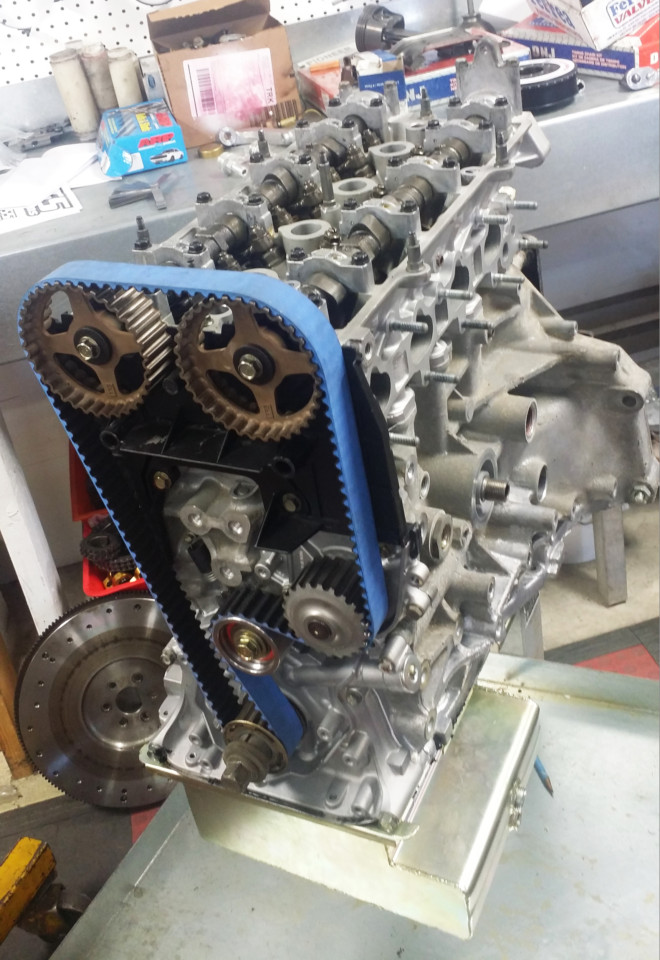
That left us with what we could do to the Honda B18A1 engine, which wasn’t much: blueprint, balance, and bore 0.40 inch over stock. We could port-match the intake and the head within 1 inch of the outlets and ensure we got the compression to the maximum of .5 above the OEM number. We left all of that hard work to Rich Olivier at TEM Machine Shop in Napa, Calif. We also had a few more options available to us within the Honda Challenge rules: a header, intake tubing in front of the throttle body, underdrive pulleys, ignition, increased fuel pressure and standalone engine management.

When you are looking for an engine builder, look at the assembly room where they build race engines. If the room looks clean, organized, and professional, like the one at TEM Machine Shop, then lay down your credit card and let them build you something you can trust.

We started with AEM because it has proven to be a reliable aftermarket supporter of Honda Challenge for years. We installed its fuel pump, fuel filter and fuel pressure regulator. Most Honda Challenge racers I have talked to find performance gains by increasing fuel pressure. The AEM fuel pressure regulator allows us to adjust our fuel pressure to the optimum level, based on dyno-tuning the engine.

Because we have heard horror stories about stock Honda distributors, we upgraded to AEM’s coil-on-plug conversion kit. This system allows you to replace the distributor with an engine position module, which tells the four separate coils, placed directly on top of the spark plugs, when to fire (AEM part number PN30-2860). Another concern Honda racers had shared with us was that the stock ECU motherboards are aging and are starting to break down. Since the Honda Challenge rules allow for a standalone engine management system, we decided to keep it all in the family with AEM so everything would plug and play and work well together: ignition, fuel and engine management. We decided to use the extremely programmable and versatile AEM Infinity system.

This AEM engine position module replaces the stock Honda distributor. A secondary benefit of this system is less rotating mass than the stock distributor, making the engine more efficient.
The AEM Infinity standalone engine management system that replaced the stock Honda ECU is infinitely programmable and can do all sorts of trick things that I don’t understand. I leave that to the engineers at AEM and AJ Gracy at Performance In-Frame Tuning to make the magic happen.

As part of the blueprinting of our engine, we pulled the stock fuel suspens and shipped them to Injector Experts in Ohio. For $20 per injector they clean them and then test them at different fuel pressures. They provide a report and photos showing the spray pattern of each injector so you know the injectors are working as they should. If you have a bad one, they will help you replace it. With a four cylinder, it was a no-brainer for $80. If I raced a V-10 Viper, that could add up in cost. Then again, if I were racing a Viper I could probably afford it.

Injector Experts technicians view the spray pattern through this clear tube. They measure flow for each injector in comparison to other injectors on your car to ensure they are all operating at the same level.

To connect all of the components together we replaced the aging stock wiring harness with a mil-spec engine harness from Chase Bays. Chase Bays asked us what systems we would be using, which systems we would be deleting (reverse light on transmission, any smog controls, etc.) and then built us a custom wiring harness that only used what we needed. Fewer wires equal fewer headaches and less weight. The harness was clean and plugged right into everything we had on the engine.

This mil-spec engine wire harness from Chase Bays really cleans up the engine bay by deleting wires a race car no longer needs. Chase Bays included all new connectors and added the AEM specific ones we needed for the coil-on-plug conversion system.

Because we really couldn’t make our engine quicker internally with modifications like bigger cams, we tried to ensure that all the power the engine would create could get to the wheels. We started that by lightening things attached to the engine that were legal, according to Honda Challenge rules. We worked from the crank outward. On the front of the engine, we replaced the heavy crank pulley/harmonic balancer with an aluminum underdrive pulley from Unorthodox Racing. We saved 6.5 pounds right there. On the other side of the crank, we added a lightweight flywheel, a lightweight clutch, and used ARP bolts to hold it all in place, saving another 13.7 pounds. That is a total of 20.2 pounds of rotational mass off of the crank. That is an amount you will definitely feel behind the wheel.

In trying to lose as much rotational mass as possible, we opted for this four puck, non-sprung clutch that weighs just more than 1.5 pounds. Even with the limited surface area of the clutch material, the clutch still hooks up well during standing starts.
In trying to make the engine more efficient, we added an underdrive crank pulley from Unorthodox Racing. This pulley doesn’t come with a harmonic balancer, which makes it extremely light. We tested it, along with the matching alternator pulley, on our backup car and had no issues.
Rich Olivier at TEM Machine Shop uses this trick computer display to balance the Honda B18A1 crank within just a few grams. Since you can’t modify B18A1 engine internals for the Honda Challenge 4 class, you want the engine to be as balanced and efficient as possible.

To hold the power plant firmly in place in the Integra chassis, we installed a set of Hasport mounts. The Hasport pieces came with all-new bolts, looked great, were lightweight, and fit perfectly. Racers can choose the hardness of the urethane inside the Hasport mount (Street, Race, Extreme Race and Most Extreme Race). We chose the “race” versions. Hasport said the stiffer versions were designed for drag racers.

A lot of bolts connect a B18 engine to an LS transmission and some are just a bit longer than others. To help me remember what went where, I made this cheat sheet.

Once we had some power built into the engine, it was time to concentrate on getting that power to the ground. We sent our Honda LS transmission to Synchrotech Transmissions in San Dimas, Calif., for a complete rebuild. The guys at Synchrotech were kind enough to let me hang out at the shop and watch the rebuild from beginning to end. We added an M Factory 1.5-way, plate-style, limited-slip differential and changed our final drive to 4.71:1 for better gearing out of the corners.

Synchrotech torqued each bolt and marked the top of the bolt with a red pen so there was no confusion if a bolt had been torqued to spec or not. For the final drive gears, I asked them to torque them a second time, hence the X marks.
Watching the guys at Synchrotech install the gear stack in the transmission made me realize I never want the responsibility of doing that job. That is something that needs to be done by the experts, and I’m no expert.
This is the M Factory 1.5-way, plate-style locking differential on the bench at Synchrotech Transmissions. Once we installed it, our car came alive out of every corner. My opinion is you can’t race Honda Challenge without it.
Inside the diamond-shape hole, you can see this diff is set up for 1.5. Changing the shape of the bock inside of the diamond makes this diff a 1 way, a 2 way, or a 1.5 locking differential.

From the engine, through the transmission, to the sticky Toyo Proxes RR tires, there is a vital piece of equipment on front-wheel-drive Hondas and Acuras that makes it all work: the axles. I have smoked at least 10 axles over the years racing Integras. To avoid more failures, we got rid of the cheap Napa Auto Parts remanufactured axles and went with a performance part from Insane Shafts. Insane Shafts builds its axles for 500 horsepower drag racing Hondas and then adds a thicker boot around the CV joints for road racers. This axle was developed over the years through working with Marcel De Kerpel of DK Racing, who races H2 in NASA’s SoCal region. Marcel has been running the same untouched set of Insane Shafts in his Honda Civic for threef seasons.

How important are upgraded axles like those built by Insane Shafts? Well, this was a remanufactured axle from Napa Auto Parts. Once the boot failed, all of the grease went away, creating extreme heat, which resulted in a failed axle and a lost race. The boots are extremely important.

Once the engine and transmission were installed in the Integra’s engine bay, we used an AEM intake pipe to grab cold air and streamline it to the throttle body. The next thing to do is taking the car to AJ Gracy at Performance In-Frame Tuning and get it on his chassis dyno so he can fine-tune the AEM Infinity computer. Only then will we really know the horsepower number and see if our Honda Challenge racecar has a shot at a National Championship in October.

We cleaned and painted the engine bay light gray to allow us to see quickly if there are any fluid leaks. You can see the machined aluminum rear engine mount from Hasport mounted to the subframe assembly.
There is some debate among Honda Challenge racers about the perfect length intake tube, but shorter versions pull air from under the hood, which is hot from the engine. This AEM intake tube will provide cold, clean air from the right front fender area of the car.
Rules allow any oil pump. This pump from Endyne Energy Dynamics is supposed to be the best, however it uses an aluminum body from a B18C1. That means that the B18A1 lower timing belt cover no longer provides coverage. An eBay search provided us with a B18C1 lower timing belt cover to resolve the issue. No problem except this little discovery delayed us installing the engine and cost more money.
While we were working on the powertrain, parts arrived, allowing us to complete our suspension rebuild. A 32 mm, 0.120 wall, rear sway bar from ASR mounts to a stronger portion of the frame of the car, avoiding the Honda specific issue of the rear subframe tearing. We also picked up a 32 mm, 0.95 wall tube from ASR for some adjustability at the track. The piece mounts next to the Motion Control Suspension coil-over struts.

Next month we will feature the finalizing of our budget Honda Challenge racecar build with some aerodynamic modifications, interior upgrades, paint, stickers, a track day shakedown and maybe even some dyno numbers.

To read more from Rob Krider or to contact him go to www.robkrider.com.

Image courtesy of Rob Krider

Join the Discussion