Now that the clutch is installed, it’s easier to drop in the engine and transmission as one assembly rather than doing them one at a time.
Depending on where you look, the two men credited with inventing the modern automotive clutch more than 120 years ago were two Frenchmen, Louis-Rene Panhard and Emile Levassor. It was a seminal moment in the automotive industry and it essentially ushered in the modern powertrain still in use today.
And racers have been tearing them up ever since.
The clutch hasn’t really changed much in terms of design. The pressure plate bolts to the flywheel, sandwiching the clutch disc in between in the process. The pressure plate is connected to the engine and the disc slides over the splined input shaft on the transmission. When you push the clutch pedal in, it presses the release bearing against the pressure plate’s diaphragm, which relieves the pressure plate’s clamping force on the disc. That action disengages the disc — and input shaft — from engine power and allows you to select a gear or shift up or down. When you release the clutch pedal, the pressure plate clamps down on the disc, which transfers the power to the input shaft and ultimately the driveshaft and rear axles.
Yes, the modern clutch has changed a lot in terms of friction materials used, but it functions pretty much the same way it has for more than a century.
Normally, a clutch is changed with the engine still in the car. You remove the driveshaft, support the transmission with a jack, remove the mounting system, unbolt it from the engine, slide it back and drop it out. Voilá, as they say in French.
We had the chance to do one with the engine out of the car, which is a lot easier, and we didn’t have to spend any time on our backs during the install. Clutches are so similar, the bulk of this tech story could be applied to a clutch installation on any car from any continent, American, Asian or European.
As with any major repair, it’s important to have a factory service manual on hand to get the detailed information such as torque specs. The job involves some heavy lifting, and it is detailed, but it isn’t terribly difficult. If you’ve never done a clutch job before, follow along as we do it the easy way.
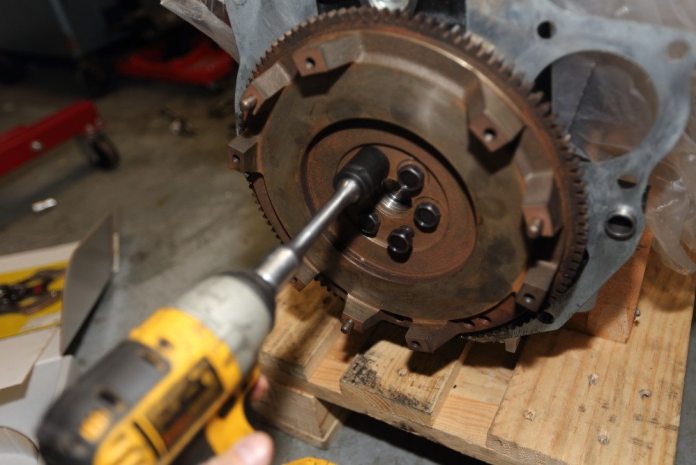
Most of the time, you can get everything you need in a kit. Our kit from Advanced Clutch Technology came with the pressure plate, disc, release bearing, pilot bearing, alignment tool and a little grease.Because Mazda makes it so easy to get replacement parts, we opted for new flywheel bolts, which come pretreated with a thread-locking compound. Despite its looks, the flywheel had been resurfaced, but it had been sitting in the garage for a while. The rust will come off the friction surface the first time you engage the clutch.Start the flywheel bolts by hand, then run them in with an impact gun. No need to hammer them in with the impact. You’re going to tighten them using a torque wrench.You’ll need someone to hold a breaker bar attached to the balancer bolt at the front to keep the engine from turning while you torque the flywheel bolts.Torque the flywheel bolts to 74 foot-pounds using a decent torque wrench. Torque them diametrically across and around the bolt pattern.Press the pilot bearing into the back of the flywheel. Alignment here is important. The transmission input shaft slides into the center of the pilot bearing. It needs to be straight.Find a socket that is the same diameter as the outer race on the pilot bearing and gently tap it into place with a mallet. Don’t just wail away at it with the mallet. You can damage the bearing that way.Now it’s time to use the alignment tool that comes in the kit.Insert the alignment tool through the clutch disc from the transmission side. Most often, the disc will be labeled as to which side faces the flywheel. It is often possible to bolt the disc in backward, and it will still go together, but it won’t work. This is critical.The alignment tool slips into the pilot bearing and holds the clutch disc in place. The appearance of your disc will vary. This is an unsprung, four-pad racing clutch not really suitable for street use. Most clutch discs are actually discs that have a springs in the hub to cushion engagement.The pressure plate goes on top of the disc and flywheel. It slides over the dowels on the flywheel, then bolts in place. In this case, there’s only one way to orient the pressure plate on the flywheel.While we were at it, we picked up some new pressure plate bolts from Mazda, too.Treat the pressure plate bolts with thread-locking sealant to help them stay in place.Once you get all the pressure plate bolts started, torque them in place, again, diametrically across and around the bolt pattern. The torque spec on a Miata pressure plate bolt is 17 foot-pounds, which isn’t much torque at all. Check your service manual for the right figure for your engine.Dab the grease supplied with the kit on the splines of the clutch disc. This helps the input shaft slide into place when you attach the transmission.It’s also a good idea to grease the “tines” on the release fork, the saddle on which it pivots and the pocket into which the slave cylinder piston fits. We used brake and caliper grease because of its ability to withstand high temperatures without liquefying.Slip the release fork through the opening in the bell housing and install the dust boot.With the release fork in place, you can slide the release bearing over the input shaft and fit it into the “tines” of the fork. A light coating of grease on the input shaft and on the bearing where it contacts the diaphragm of the pressure plate helps things work smoothly.To help get the engine and transmission aligned properly, we cut the heads of some old bell housing bolts and threaded them into the engine block. By doing that, we could slide the transmission onto the engine, which was effective in lining up with input shaft with the pilot bearing. Once we got the engine and transmission “mated,” we removed the headless bolts and replaced them with the regular bell housing bolts.We still needed a low-profile transmission jack to align the transmission with the engine. A Miata transmission isn’t that heavy, but it’s still pretty unwieldy.