See if you have heard this one before. A guy gets involved deeply enough in HPDE that he buys an open trailer to tote his track car back and forth to the events. Then as soon as he gets a competition license, he turns his sights toward an enclosed trailer. Knowing that’s what would happen to me, I skipped an open trailer, because I knew that as soon as I got one, I’d want an enclosed. Trouble was, my budget was limited, so that meant searching for a decent used trailer. It took a few months of scouring, but I finally found one that would work.

For just a bit more than a new, open trailer, I bought an 8-foot by 20-foot enclosed trailer with built-in cabinets and a countertop with drawers. Trouble was, it was used for a long time to haul ATVs back and forth to the desert. Evidently, the previous owner’s ATVS all leaked oil, so the bare plywood floor was a spotted mess. I probably could have painted it, but that would have meant sanding and priming and painting, and of all the tasks in the automotive world, I probably hate sanding the most. Painting is the not-so-distant second. Even after I had painted the floor, I likely would not have been happy with it, so that meant finding another solution. I could have used linoleum tile, but it might not have adhered to the oily wood.

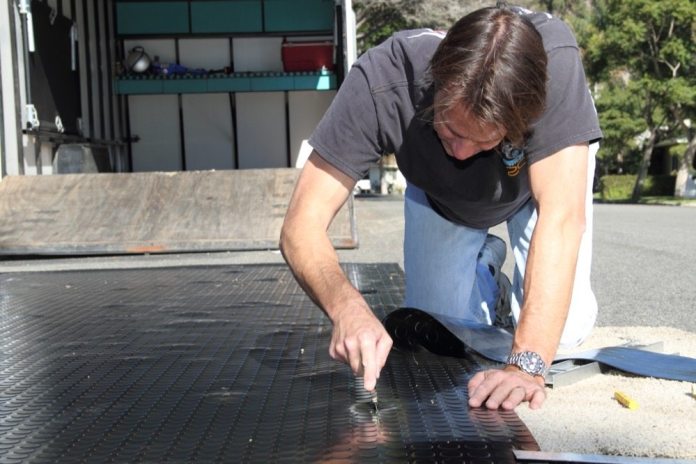
There were other options, such as garage tiles and mats or recycled rubber gym tiles, but they either cost more than I wanted to spend — more than $500 — added a couple of hundred pounds of weight or wouldn’t stand up to petroleum products being spilled on them. Then a buddy pointed me to the Home Depot website, which offered an 8-foot by 22-foot roll of coin-mat flooring for $341 plus freight. It weighed about 125 pounds, which was doable and it was thick enough that it wouldn’t require glue to hold it down. Home Depot also offers a 10-foot by 24-foot roll for $465, which is ideal for car trailers that measure 8-feet 6-inches wide.

Installation was pretty straightforward. Measure everything twice so you can cut once. Draw out the floor plan and fill in the dimensions. Get a buddy to help you if you can. I could have just laid down the mat and called it good, but I bought some 1-inch aluminum strips to retain the edges and make for a more finished look. Now I have a trailer that is much nicer inside, which is good because it also is my hotel during race weekends. With a bit of luck, the mat might keep it warmer inside, too.

Home Depot Rubber Coin Mat

Required Tools

  • Leaf blower
  • Socket Set
  • Box wrenches
  • Utility knife
  • Drill
  • Tape measure
  • Metal straight edge
  • Combination square
  • Industrial crayon
  • Scrap carpeting
  • Die grinder
  • Legal pad and pen
  • Rust-Oleum marine-grade deck paint
  • Nonskid tape

Recommended Tools

  • Knee pads

Be sure you lay the matting out in the sun to soften it up before laying it in the trailer. As you will see in the video, the rubber retains a lot of static, so every little bit of debris sticks to it. Dust it off as you roll it up so the matting won’t have any bumps under it when it’s installed.


Required

First things first. Remove everything from the trailer and detach the D rings from the floor. You can cut out the rubber mat and reinstall them later for a nice finished look.
After you sweep out the trailer, use a leaf blower to get out the smallest bits of dirt and debris so the matting will lay flat, with no bumps under it.
The matting arrives in a roll so its edges are prone to curl up on you. Roll it out and let it sit in the sun to soften it so it lies flat.
You will need a tape measure for measuring the floor plan of the trailer, a crayon for marking the matting, straight edges and a combination square for making straight and 90-degree lines and cuts. You’ll also need a nice sharp utility knife and knee pads if you have some. Definitely knee pads if you’re over 40.
Having a friend to help you with measurements is a huge plus. Measure twice so you can cut once. Check and recheck your work before cutting. The matting is too expensive to waste.
After you’ve measured the trailer floor, record all the dimensions so you can have them in front of you when marking and cutting the matting.
Because the trailer floor was 93 inches wide, we had to remove 3 inches from one side, then mark the cuts for the wheel arches.
It’s nice if you have a piece of scrap carpet you can place under the matting to keep the blade from scraping the pavement beneath. Thin plywood would work, too.
Before you roll up the mat, be sure to wipe off all the debris. Notice the bumps under the mat in this photo? You don’t want the finished product to look like that.
If you measured and cut everything right, the mat should fall into place and lie flat.
Aluminum strips screwed into the floor along the sides help keep the mat from sliding when you engage the clutch to load or unload your car.
Be sure to file the cut edges so they are square and free of burrs.
Drill pilot holes through the strip, mat and floor. Then drill holes in the strips that will accommodate the diameter of the screws.
By using screws just a little bigger than the pilot holes in the floor, you’ll get a nice tight anchor.
The holes for the D rings are easy to find. Just cut the mat away to accommodate the recessed cup and the bolt holes.
When you bolt the D rings back in place, they provide further anchoring for the mat, and you’ll get a nice, finished look.
Simple 90-degree cuts are good enough hold down the sides of the mat.
Because you took the time to wipe down the mat before laying it down, you don’t have any unsightly bumps under it. The seams where the plywood floor planks meet are still visible, though.
There wasn’t enough mat left over to cover the ramp door, so I painted it with Rust Oleum marine-grade deck paint and added some nonskid tape at the wheel tracks.
Call this the “after” shot. With the ramp door and wheel arches painted, the interior looks much better than when we began.


Images courtesy of Brett Becker and Eric Green

Join the Discussion