I have been asked to describe VIR many times. You would think that after 16 years, hundreds of races and thousands of laps, it would be easy to answer the question, but it is never easy to describe nuance because, well, it’s nuance — and VIR has it in gobs.
I’ve heard the story many times, and true or not, I like to believe it because it is a good one. The story goes that one day in 1956 a couple of sports-car guys fired up a bulldozer on a farm in southwestern Virginia, dropped the blade and started carving a circuit that would become a playground for those afflicted with the road-racing bug. The VIR we drive today is virtually the same circuit that was cut back in the days of Eisenhower and Marilyn Monroe. For every time I have driven VIR in reality, I have driven it 100 times in my head, many times wondering what its creators must have been thinking as they rode that bulldozer. I didn’t know those men, but I feel it’s safe to assume they had gentlemanly attributes of brass and a darn good sense of humor.
I’m honored to have been asked to create this guide. I have made thousands of laps here in many different types of cars. However, the great majority of my laps have come behind the wheel of a Spec E30 or American Iron Mustang. I never feel as though I have learned it all, but in my 16-year relationship with this hallowed ribbon of asphalt, I have picked up a thing or two. I humbly offer to you my perspective. The following description is based on a dry track. There will be many references to curbs. If it is wet, stay off the curbs
Turn 1

This is a late-apex right-hander, taken in second or third gear. Most cars will be at the top of fourth or near the top of fifth gear entering the braking zone. There is plenty of runoff in front of you or to the left, but to the right? Not so much. A driver’s brake marker will vary, but most cars will find the sweet spot between 4 and 2.5. If you haven’t been to VIR before, try 4.5 first. The apex is very late in this turn, but if you are going to err, do so on the side of early turn-in. If you are too late here, the marbles will help you find out how well your splitter is attached. If you have gotten the beast slowed down, you can be somewhat aggressive going to the apex. Touch the curb, and as soon as you do, start opening the wheel and adding throttle with medium to medium-high aggression, eyes up and looking for the exit curbing on driver’s left. Four wheel drift out to the exit curbing. At the end of the curbing, you should be looking for a seam in the asphalt down the center of the track. Gradually work your way over so that the seam is lined up with the center of your hood.
Turn 2 and Turn 3 “NASCAR” Combo


Turn 2 is a fast, gentle left-hander taken in third or fourth gear. Turn 3 is a fast, medium-open left-hander, taken in third or fourth gear, and a good place for left-foot braking.
Turn 2 is barely a turn, but the placement of your car in this turn will dictate angle and speed through Turn 3. Most cars will be heading near redline as they approach Turn 2. Some drivers will shift up and try to carry the higher gear through turns 2 and 3. Some drivers will hold the lower gear and tickle the rev limiter to save the downshift going into Turn 4. Some will upshift between Turns 2 and 3 only to downshift before going into Turn 3. However, I don’t recommend this because it is very busy and can make your entry into Turn 3 inconsistent.
The other decision will be line choice. There are two schools of thought on the line through Turn 2. The one you choose depends upon how your car likes to attack Turn 3. High-power cars will, generally speaking, like to almost touch the curbing at the apex of Turn 2 on driver’s left because it allows a straighter path to Turn 3 turn-in, and the ability to stay on-throttle a touch longer. It is the straightest way to get to the turn-in point for Turn 3. However, the angle of attack to the apex of Turn 3 is much sharper and requires more effort to rotate the car at turn-in.
The other approach is to stay at middle to middle-right track going through Turn 2. This method loads the right suspension for a longer period so your inputs must be gentle. However, the angle of attack to the Turn 3 apex will be softer and allow a broader angle of attack, which preserves momentum. Turn-in will depend on which line you choose. If you choose the first option, your turn-in will be very slightly later. Look for the gray curbing at driver’s left. Most will find their turn-in point to be just prior to the beginning of the curbing on driver’s left. Turn 3 track-out really depends on your car. Softer-suspended cars can jump the exit curbing and use the extra asphalt, but stiffer cars would do well to carry to the curbing but not over it.
Turn 4a

This is a very tight left-hander with an extremely late apex. It’s taken in second or third gear, and is a possible spot for left-foot braking.
Turn 4a is the slowest turn on the track, but the proper line through it affects your speed heading into the Uphill Esses. Hit your marks perfectly through turns 4, 5 and 6, and you may find you have the juice to stick a pass just after the bridge, going into the Uphill Esses at Turn 7.
Patience is a must. The apex of this turn is pretty much also the exit. Entry speed should be sufficiently slow as to allow the driver to touch the apex at the end of the interior curbing at driver’s left. This action will line the left side of the car up with the edge of the track on driver’s left at exit and give the best angle of attack to Turn 5a. If you find yourself in the middle of the track at track-out you have either approached too quickly or opened the wheel too early.
Turn 4b, 5a, 5b Combo


Turn 4b is an increasing radius, midspeed right hander also taken in second to third gear. Turn 5a is a slightly decreasing radius midspeed right hander taken in third or fourth gear.
If you have done Turn 4a properly, you should be midway through your throttle travel as you bring the wheel back to the right for Turn 4b. Turn 4b apex is midcorner. Kiss the curbing driver’s right at apex, but stay on the throttle, allowing the car to drift to the curbing at driver’s left to exit. Most will have to make an upshift in the short straight between Turn 4b and Turn 5a. For those not carrying enough speed, turns 4b and 5a will seem like two turns. However, for those carrying enough speed, the combination will resemble one large double-apex turn.
Turn 5a is the entry into the Little Esses. If your car’s suspension is relatively soft, don’t be afraid to put the right front wheel on the green and yellow at Turn 5a. Even those with stiffer suspensions will want to experiment with getting a right front wheel on the Turn 5a curbing. Turn 5b curbing is pretty much the exit for Turn 5a, and you should see your steering wheel almost completely straight and your right foot planted.
Turn 6a and Turn 6b

Floor it and look far ahead. At the exit of Turn 6b, you will want to be driver’s right.
Turn 7

This is a very fast shallow left hander with a midcorner apex, taken in fourth or fifth gear. Most drivers will exit Turn 6b and follow the track on the extreme right, under the bridge, using the cutoff road for VIR’s North Course as a turn-in for Turn 7. I have found luck drawing a straight line from the exit of T6b to the apex of T7. This method minimizes the lateral suspension load transitions and shortens the track slightly. I suggest trying both methods.
Turn 8a and Turn 8b

These turns present a right-left combination taken in fourth to fifth gear. This is the rhythm section of the track. Lower-power cars normally will not need it, but high-power cars may require a small lift between Turn 7 and Turn 8a. Unless your car is sprung very stiffly, the fast way through this is section is to put the inside tire directly over the curbing while turning the wheel as little as possible. Turns 8a and 8b are pretty straightforward. They are right in front of you, challenging your intestinal fortitude. The best advice I can give here is to feel the rhythm of this section and remember that the song’s tempo increases as your right foot finds the floor. Treat your dance partner gently and be smooth.
Turn 9

This is a fast, uphill, blind, right-hander with a midcorner to late apex taken in fourth to fifth gear. Your exit of Turn 8b will — almost — line you up with the curbing for Turn 9. Do not hesitate when bringing the wheel back to the right. Doing it correctly will make you feel like you are turning in a smidge too early, but you must get to the curbing on driver’s right. You don’t so much attack the apex as drift through it. A kiss on the curb is all you want, but a tire on top of the curbing won’t hurt too badly. If you are late here, you will likely have to lift upon exit. Crest the hill, tracking out no farther than center left and bend your line back to the right side of the track in preparation for Turn 10.
Turn 10

This is a fast, off-camber, left-hand turn with an early to midcorner apex and a blind exit taken in third or fourth gear. This is one of two turns that will require donning your big-boy pants. Left-foot braking can really help to balance the car through this turn. Turn-in is early. Look for the beginning of the concrete curbing on drivers left and put your left front wheel over the beginning of the curbing. As you track-out, look way down the track to the brake markers for Turn 11. Concentrate on getting the car pointed at the last sign that has an arrow on it. Use all of the track, including curbing at exit. Upon exit, straighten the wheel and make a beeline for that arrow. If you feel you will run out of track at the exit, do not fight it. Open the wheel and let the car bounce through the gloriously large field on driver’s right. The wall off the track to driver’s left is only about 50 feet away. Many have struggled to keep a car on track at Turn 10 exit only to drop a right rear wheel, rotate the nose directly toward the wall on driver’s left — and discover how well their HANS device works.
Turn 11 and Turn 12


This double right-hand combination leads onto the nearly 1-mile-long back straight. One extra mph through this section can yield an extra 3-5 mph at the end of the back straight. The braking zone for Turn 11 is uphill, but turn-in is on a more level surface. The arrow sign indicates turn-in and it is actually pretty accurate. You will be tempted to touch the Turn 11 curbing on driver’s right, however slow hands will prevail as you allow the car to ride the outside of the turn while pulling a downshift. Taking a broader line through Turn 11 will load the front outside wheel as you brake for the turn-in to Turn 12, allowing for a faster rotation. For many cars, turn-in for Turn 12 will coincide with the beginning of the concrete curbing on driver’s left. This is the place to show off your heel-and-toe/trail-braking skills. Turn 12 apex is midcorner and should be firmly aimed for. Open the wheel and use all of the track at exit, including what is outside the concrete curbing. Again, the choice to use the asphalt outside the main curbing will depend highly upon suspension stiffness. Upon exit, get your eyes up and drive a beeline to the top of the crest that is in front of you.
Back Straight
Drop the hammer, rock and roll, full tilt boogie! My guess is that back in 1956 the track’s creators must have stopped for lunch about when the bulldozer arrived at the Turn 12, better known as “Oak Tree.” And given the somewhat meandering path that the back “straight” takes, one wonders if a cork or two might have been left under the shade of that oak tree’s broad branches. A word of caution: Always check each flag station on every lap. However, paying attention to the station on driver’s left at the crest of the back straight is particularly important.
Turn 13

This is a fast turn, but under heavy braking with a slight left-hand kink and a late apex. The braking zone is uphill and allows for braking later than you will think, initially, but the apex is late and over a slight hill. You will want to go to the curbing on driver’s left and stay as left as you can to be in the best position for Turn 14 attack.
Turn 14 and Turn 15


Turn 14 is a slow right-hander, slightly off-camber with a late apex taken in second or third gear. Turn 15 is a medium-fast downhill left hander with a midcorner apex, also taken in second or third gear.
Turn-in for Turn 14 is at the end of the curbing driver’s left of Turn 13. Be patient here and get the car pointed to Turn 14 apex prior to rolling on the throttle. Open the wheel with semi-aggressive throttle through the apex and allow the car to drift to the curbing at exit on driver’s left. Immediately bring the wheel back and drive over the curbing at the apex of Turn 15, adding throttle aggressively. Track out completely to the exit curbing on driver’s right, but just kiss it.
Turn 16a, 16b and Turn 17


It’s time to put on your big-boy pants again. If you are unsure about which gear to be in as you rocketed from Turn 15 to Turn 16a, try the higher of the two through this section. If you left-foot brake, it will serve you well in Turn 16a. Turn in early for Turn 16a and put a left front tire squarely on top of the curb, then add a quick input of the wheel to the right and place the right front tire on top of the curbing of Turn 16b. The exit of 16b will feel like you are falling off the face of the earth.
Salvation comes at the bottom of the hill when gravity loads the suspension and grip returns in glorious amounts. You should be on-throttle throughout this entire section but you need to wait to be aggressive until the suspension compresses at the exit of 16b. Allow the car to drift out to the exit curbing on driver’s left while under full throttle. Touch the curbing if you are stiffly sprung. Softer-sprung cars can actually put a wheel on top of the curbing without issue.
Turn 17 has a midcorner apex. You should be rolling on the throttle aggressively as you pass over the apex. Do not struggle to get to the apex of 17 by lifting if your car doesn’t want to get there. Less grippy, less horsepower cars may find it more advantageous to stay in the throttle and miss the apex by as much as 6 feet.
Front Straight/Turn 18

This section is a high-speed right-hand sweeper taken in the highest gear with your right foot planted. There is a very fast kink in front of the control building. Upon exit of Turn 17, draw a beeline for the apex at Turn 18. Clip the apex and track out to driver’s left upon exit and your next lap begins anew.
About Chris Cobetto

Chris Cobetto has held a competition license since 1998. 2015 marks Cobetto’s 16th year as Regional Director for NASA Mid-Atlantic and 14th year as the director of HyperFest. As a driver, Cobetto’s accomplishments include four Mid-Atlantic Regional Championships in Spec E30, three Mid-Atlantic Regional Championships in American Iron, and Spec E30 National Championships in 2006, 2007 and 2009. He holds lap records in American Iron at VIR, and Spec E30 at the Summit Point and Shenandoah circuits at Summit Point Raceway. He currently lives in the Richmond, Va., area with his wife, Laura, and sons Jack, 13, and Cooper, 9.
Videos
Here are two fast-lap videos showing the line at VIR. The first comes from Chris Cobetto and has turn-by-turn narration. The second is from NASA-driver-turned-pro Mike Skeen when he set the lap record in 2008.
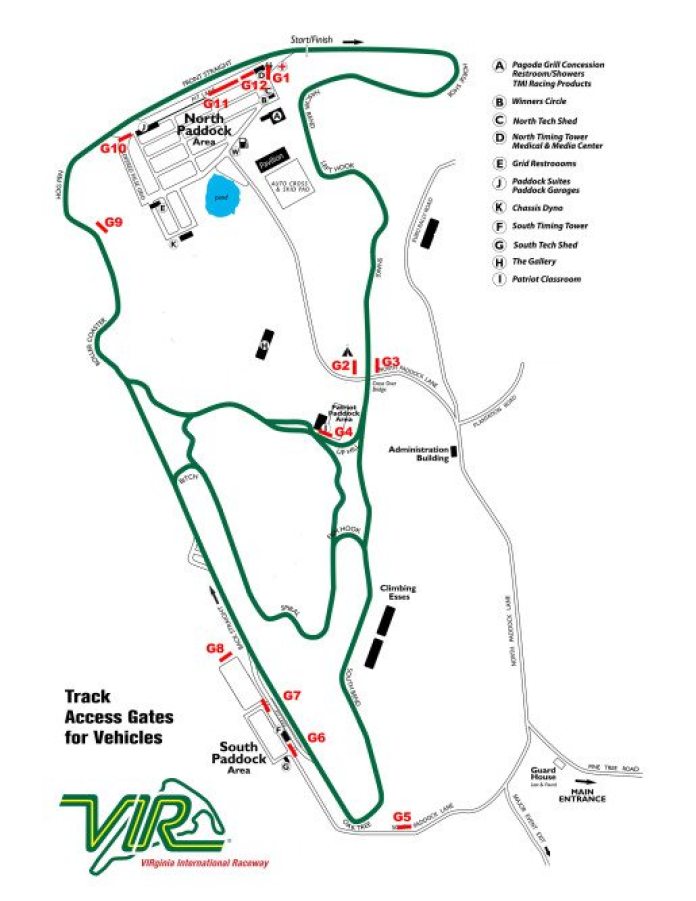
Maps
Here are a few facilities maps to help you find your way around VIR.