


I’ve been blessed and spoiled to call Road Atlanta my home track. I first visited the Road Atlanta tagging along with my friend Scott in the mid ‘70s. His dad was a driver in the Camel GT Series, and he made us feel like we were part of the crew.

Fast forward almost 40 years and I’m fortunate enough to be racing alongside a living legend, Gene Felton, the winningest IMSA driver in history, that same guy who let me tag along with his son Scott many years ago — and yes he is still fast as hell.
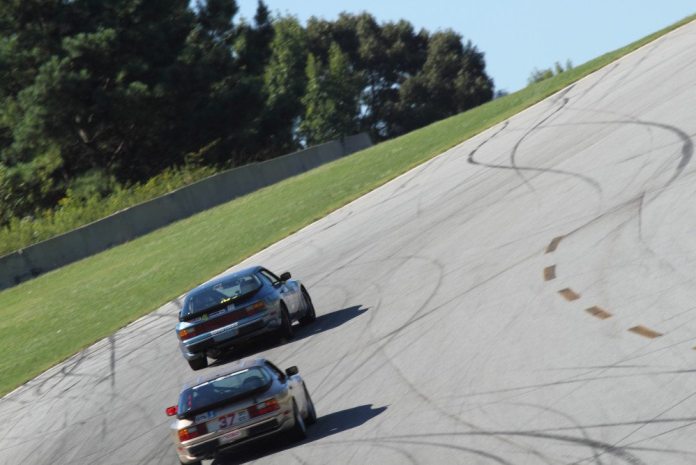
A lap at Road Atlanta can be very different depending on what kind of car you’re driving, but for each, it is without question one of the best laps in America. I must say up front that Road Atlanta can bite you. The track is lined with concrete, and most offs end up against something hard. This is part of its true Southern charm. Respect it and you will be rewarded. Try to overpower it and it will teach you an expensive lesson. Kind of sounds like my ex-wife.
When doing a walkthrough of a lap, I always start with the front straight because it sets up the entire lap.
NASA Southeast’s Matt Isbell demonstrates how to get around Road Atlanta with a quick lap in his LS-powered Datsun 240Z.
TURN 1
Turn 1 is where I see drivers leaving time on the table. First you have to determine a good marker for your braking zone. I have found a marker on the outside wall at the end of the pit lane on my left a good reference. This uphill right-hander has more positive camber than you think. A track walk will help the newcomer greatly. The uphill compression on the car can really help mechanical grip and maximize your entry speed.
I try not to clip the inside apex curbing because it can upset the car more than necessary, but can be useful in traffic when overtaking is key. The start of the race would be a good example. I like to maximize exit speed here by using all the track-out possible. I know I’ve done my best when I get the car’s slip angle set upon entry, get on the gas before the apex and never change my steering input the entire turn. Be careful not to put two on the gators at track-out because it can cause quick snap oversteer. Avoid any sudden steering input and drive the car straight up through the grass toward Turn 2 to avoid disaster.

TURN 2 AND TURN 3
Upon exit of Turn 1, you will be rising uphill and blind to the next two turns. There are numerous references you can use to get the car set for entry until you are comfortable. There is a telephone pole to the right of the corner worker station. It is a visible marker to get the car going in the right direction. Turns 2 and 3 are a dance. They are a quick slight left and a hard right. I always describe these two together because they happen in the blink of an eye. Turn 2 entry is key. I set the car up along the rumble strip at the left of Turn 2. It is important to have the car as straight as possible to accommodate a quick touch on the brakes then trail into Turn 3. Turn 2 is right at the crest of the incline, so the car is unloaded with not a lot of mechanical grip. I see people lock up here and have all sorts of problems on their turn-in to Turn 3. Get your braking done in a straight line and Turn 3 starts with an early turn-in. The goal is to put your right front wheel over the apex curbing. If you miss the curbing at speed, most drivers will lose momentum due to having overshot their entry to Turn 4.
Turn 3 is the perfect place to demonstrate the importance of looking through the apex and keeping your eyes up. This is probably one of the most recognized spots on the track for photographers, because many cars will have two to three wheels off the ground as they go over the curbing. Like I said, this left-right-left dance step is fast and takes time to get right. Never mastered. Let’s mention as well that if you miss your mark here or traffic drives you off, try to be patient with your hands and drive the car through the outside of Turn 3 and even Turn 4. Hasty decisions here to get back on track too quickly can be met with the inside wall.


TURN 4
Turn 4 is a long sweeping left-hander that acts as the setup for the Esses. If the track-out of Turn 3 is done properly, it will set the car up for putting the front left tire on the Turn 4 apex curbing. Hug the curbing. This turn’s apex is a great place to use momentum to overtake and slingshot past a slower or unsuspecting car as you enter the top of the Esses. I try to accelerate the entire time I’m in this corner, and if I feel the car starting to understeer, I will short shift and let the car regain some front grip for my turn-in to the top of the Esses. I mentioned that this turn is a great place to use momentum to overtake on the inside and entry to the Esses. Please be mindful of the clag /marbles that are off line, which can effect grip while tying to overtake.

THE ESSES
The Esses consist of three connected turns. Elevation also is a variable to consider, because you are going downhill upon entry to the Esses and uphill upon exit. The entry to the top of the Esses is blind. Find a marker that works best for you. I prefer an early turn-in, and at that point I can see the entire complex of turns all the way to Turn 5. Keep your eyes up and imagine at this point you were able to draw a straight line in your mind that might take the car over a few curbs, especially the one on the left at the bottom of the hill. High-downforce cars and prototypes don’t like this line because it can upset their cars too much and even damage splitters and diffusers. I, however, prefer this straight-line approach because it requires smaller inputs and I think there is adequate grip on top of the curbing, unless it’s raining of course. This is a fast part of the track and it is difficult to pass here, thus faster cars can get stuck behind slower traffic. I point this out because the position of the car upon exiting the Esses can be very important to ensure a car doesn’t get the jump on you with momentum going uphill out of the Esses. Also noteworthy, if rain does fall, a river will flow across the track at the bottom of the Esses and needs to be accounted for.

TURN 5
Turn 5 is an uphill left-hander that serves as another great overtaking turn on the course. I mentioned before that the Esses are a difficult place to pass and faster cars can get bottled up here, especially upon exit. This is where a higher horsepower car can use its brawn to plan a successful pass while accelerating uphill. Slower momentum cars will try to use as much track-out as possible to keep their speed up the hill. The inside curbing of Turn 5 is a no zone. I try to stay off of it, because it is steep and can upset the car, quickly sending you into a spin. The track pavement offers the most grip, and the track-out concrete is quite wide here and is typically used by most. Be aware that this area can be very slippery when wet and trying to put down the power too soon on this surface can send a car into the outside wall more often than we care to mention. Just look at all the skid marks heading to the outside tire barrier.
I find my best times through Turn 5 are when I get my braking done early and get on the gas sooner than my competition. Too many people lose momentum and enter hot only to cause the car to understeer and decrease their exit speed. In traffic this can be an area where there is a lot going on around you, and it’s happening quickly, so be sure to check your mirrors sooner rather than later, and know who and what is around you.


TURN 6
There is a short straightaway between Turn 5 and Turn 6 that can set up an inside pass in Turn 6. Turn 6 is a fast right-hander that has more camber than it appears to have. The track walk will prove to be very important in this corner. As in Turn 1, I see many drivers leaving time on the table here. I’ve pushed hard in testing to find my car’s limit of grip here, and I encourage every driver to push a little harder here in testing. I described turns 2 and 3 as a dance. Turn 6 and Turn 7 are much the same in that if Turn 6 is taken at the correct speed, then Turn 7 will approach quickly and is considered to be in the same dance move. I set up my turn-in to Turn 6 a touch late to maximize the camber in the turn.
Be very mindful of your mirrors here and your competition trying to dive bomb you on the inside. I let traffic determine whether I downshift upon entry to Turn 6 or whether I have open track and want to maximize my entry speed and save my blip for between Turn 6 and Turn 7. In traffic, the downshift early will free you up to have more opportunity for a quick pass of a sleeper on the inside entering Turn 7. On occasion, there can be a bottleneck of cars here, and I find dropping down even another gear is necessary to maximize my torque upon exit.

TURN 7
Sometimes I feel as if I could ride my bike through T7 faster than I’m driving in a race. This turn is often overlooked in its level of importance since LMP cars and Miatas are all going relatively the same pace through here.
Turn 7 is probably one of the easiest, since you are going the slowest, yet it also tends to be one of the hardest places on the track. In reviewing data, I have found that Turn 7 is one of the turns that will make or break a great lap.
Upon entry, I like to get my braking done early, then I can focus on hitting my marks as best I can and getting my exit speed as high as possible. Due to the slow speed of this right-hander, you must depend 100 percent on mechanical grip. Aero is not doing much for anyone here. In a track walk, you will notice a small depression in the pavement to the far left of the turn in. This can be used along with braking to help create a small amount more grip than that of your competitor who has come in hotter, turned in earlier and understeered upon exit. Simple data shows that a 1 mph faster exit speed can equal up to 10 feet at the end of the long straightaway and that can equate to .5 seconds of lap time gained.
I’m at my best when I brake early and maximize my mechanical grip. My right front tire just touches the edge of the apex curbing, I’m on the gas as soon and as smoothly as possible, and I’ve used the track-out concrete to my left to increase my radius and provide as much exit speed and momentum as possible.


Turn 8 and Turn 9
These are more like gentle bends on a long straightaway that offers every car in the field the chance to push the pedal through the firewall. I like to exit Turn 7 and stay to the left, which shortens the distance between two points. Traffic offers the chance to draft and a possible slingshot overtake. Turn 9 is your black flag station on the right and this is where the pavement moves slightly to the right and starts its downhill approach to Turn 10A. Every car on track that does not have aero will become light at the crest and should approach with care, and find the limit. Any car that has aero will be fine to be at 10/10ths here.
I have determined a permanent sign on the right side of the track as my braking point. Those of you who can stay in the gas a second longer will have that opportunity to overtake on the inside of Turn 10A. The braking zone is downhill and new pavement offers ample grip. No doubt, there will be some eager racers who have not had their vacation time and will visit the beach — and double yellows will ensue. Not many drive out of there. You will have pea gravel in your car for months. Stay out of the gravel pit.

TURN 10A and TURN 10B
Turn 10A is probably the most exciting turn on track due to all the crazy overtaking and side-by-side action through there in any given race. I will start by saying it is of utmost importance to know who is in your mirrors coming down the back straight. If it’s late in the race and it’s for position, I’m going drive it down the middle of the road and make it really difficult to pass. I’ve sacrificed exit speed and momentum, but I’ve blocked you. That’s racing.
To maximize these two turns, I once again talk about the dance. These two turns are to be viewed as one continuous movement. In a perfect world, I wait till the absolute last second to stand on the brakes coming off the fastest part of the track. I am as far right in the braking zone as possible, but not on the rumble strip, I’m out of threshold braking and now trailing into 10A, I’ve gotten my turn-in done early and my front left wheel is across the apex rumble strip almost in the grass. I stay as far left upon exit as possible to increase my turn-in radius to 10B.
This is the definition of rotating the car. It is going from hard-set left to an immediate right-hander. My front right tire is turned in again very early and across the inside apex gators of 10B. I like to apply smooth throttle, but increasing constant pedal pressure and my track-out is at the edge of the pavement. I usually catch the left gators, and it’s upsetting, but as long as I am smooth with my throttle I can get the power down. If your car is too unsettled by these rough gators, stay off them.

TURN 11
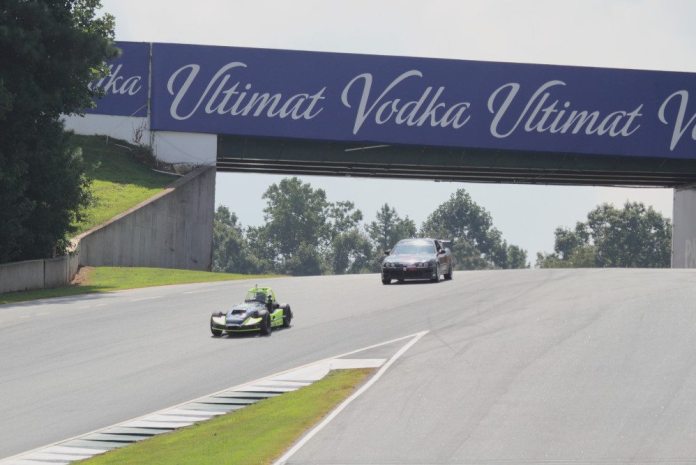
Let’s first point out that Turn 11 is completely blind. It takes many laps at Road Atlanta to get comfortable with where your car needs to be going under the bridge. The thing to notice is there is a sign under the bridge and it’s painted three different colors, yellow, red and white. I like to be between the red and white section of the sign, or favoring the right side, because it puts me in a good position going under the bridge and sets me up for my downhill approach to Turn 12. Turn 11 also is set on the crest of a hill.
You’re rising uphill from Turn 10B and then descending to Turn 12. This will be the roller coaster effect due to the negative g’s created. Once someone has learned to pick a point in the distance when they come under the bridge they will make better time. I tell students to get the car at low speeds in practice lined up correctly then look straight down through Turn 12 and pick a landmark. This way they can feel better about increasing their speed coming under the bridge and not feeling lost in a blind turn in an unloaded car flying toward the off-camber late-apex monster Turn 12.

TURN 12
I could write a book on Turn 12. I think it is without doubt one of the best turns in motorsports on any track in America. That’s a lot to live up to. This turn has stood the test of time and been somewhat unchanged since Road Atlanta was constructed in 1970. It has seen its share of incredible finishes yet also supplied its share of tragic endings.
If I have exited Turn 11 on the proper line, then I am immediately looking ahead at my turn in point. This is all downhill and the car is accelerating, so no sudden inputs here at full throttle. Smooth is the key word here. Turn-in leads to a late apex and rubber on the track should point out the line. I find that around 10 to 15 feet past the rumble strip on my left is a great turn-in point. It is right at the grass’ edge so it’s high risk, high reward. The closer you can get to the grass the wider your turn-in radius will be.
I have to trust my abilities, and while I can’t focus on the grass to my left, I am focusing my attention entirely to my inside apex curbing. Hitting your mark here is the most important mark on the track. I kiss the inside curbing but don’t get up on the curb because I need all the contact patch I can get, and I don’t want undue air under the car. Aero is working its magic here like nowhere else on track. This is why I prefer to sacrifice a little back straight top-end speed and give my car’s setup a little more downforce. I can go faster overall with this setup rather than one that’s trimmed out.
Having just kissed the curbing inside Turn12, the car is slightly off camber and understeering at high speed on exit. Once again, make no sudden steering inputs here. I have slowly worked up to this pace and trust my setup will allow my car’s slip angle to reach the track’s edge at track-out. There is a small amount of concrete at track out, and it can be used, but 6 inches to the left in the grass at that speed will more times than not end with corner workers sweeping parts of your car into piles.
I find that Turn 12 is a great place to plan and execute an pass. This is due in part to knowing and trusting the different lines at speed. If there were ever a turn that a racer might not ever feel totally comfortable with, Turn 12 is the one, and there is no shame in that. This however can be exploited in a race.
Get this one right and your lap times will show it. Take your time and get to know the turn because it is lined with solid concrete barriers, and if you don’t show it the proper respect, well, you know what can happen.


Matt Isbell

Matt Isbell has more than 30 individual NASA victories, is the current ST2 NASA Southeast points leader and has won two NASA Championships. He holds track records in various cars and classes at Road Atlanta, Carolina Motorsports Park, Barber Motorsports Park, Atlanta Motorsports Park and Roebling Road Raceway.
Isbell also is vice president of operations for MTI Racing, which was founded in 1993 and headquartered in Atlanta. MTI Racing is personally committed to being involved with its customers and its products. Each MTI staff member staff contributes with a background in engineering, fabrication, professional racing and expert troubleshooting. You can count on MTI Racing to develop products for your vehicle that are reliable and powerful.


